2019年12月25日 星期三
2019年12月23日 星期一
2019年12月19日 星期四
2019年12月15日 星期日
2019年12月14日 星期六
ubuntu install vmd-1.9.3
先去官網下載vmd-1.9.3.bin.LINUXAMD64-CUDA8-OptiX4-OSPRay111p1.opengl.tar.gz
$ tar -xvf vmd-1.9.3.bin.LINUXAMD64-CUDA8-OptiX4-OSPRay111p1.opengl.tar.gz
$ cd vmd-1.9.3
$ sudo ./configure LINUXAMD64
$ cd src
$ sudo make install
參考
https://www.jianshu.com/p/6c73d04298a2
$ tar -xvf vmd-1.9.3.bin.LINUXAMD64-CUDA8-OptiX4-OSPRay111p1.opengl.tar.gz
$ cd vmd-1.9.3
$ sudo ./configure LINUXAMD64
$ cd src
$ sudo make install
參考
https://www.jianshu.com/p/6c73d04298a2
2019年12月13日 星期五
2019年12月11日 星期三
install TensorFlow 2.0 on Ubuntu
https://www.pyimagesearch.com/2019/12/09/how-to-install-tensorflow-2-0-on-ubuntu/?utm_source=facebook&utm_medium=ad-09-12-2019&utm_campaign=2+December+2019+BP+-+Traffic&utm_content=Default+name+-+Traffic+-+Image+1&fbid_campaign=6133037120046&fbid_adset=6133037120446&utm_adset=9+December+2019+BP+-+All+Visitors+90+Days+-+Worldwide+-+18%2B&fbid_ad=6133037121646&fbclid=IwAR0waZcowCmYkt8DIkNi1U0uaer8pjUm5s_kf5CiVCMsi1PkPDOjGLWciI8
https://bangqu.com/IZeGX2.html
https://bangqu.com/IZeGX2.html
2019年12月8日 星期日
VIM and Python – A Match Made in Heaven
https://realpython.com/vim-and-python-a-match-made-in-heaven/
https://zhuanlan.zhihu.com/p/36014406
沒有安裝的套件有:
Ditch the Mouse
Buffers
Flagging Unnecessary Whitespace
Auto-Complete
Color Schemes
Powerline
System Clipboard
VIM in the Shell
File Browsing的程式碼
let NERDTreeIgnore=['\.pyc$', '\~$'] "ignore files in NERDTree
下面多加一行程式碼設定F2啟動File Browsing功能
map <F2> :NERDTreeToggle<CR>
2019年11月24日 星期日
CentOS Linux 靜態 IP 位址設定
1. 使用 DHCP 自動取得 IP 位址
ONBOOT:設定為 yes 代表開機自動啟動此網路介面。
IPADDR:IP 位址。
GATEWAY:預設閘道。
NETWORK:網路的位址。
NETMASK:網路遮罩。
DNS1:第一台 DNS 伺服器。
DNS2:第二台 DNS 伺服器。
參考
https://blog.gtwang.org/linux/centos-linux-static-network-configuration-tutorial/
TYPE=Ethernet
PROXY_METHOD=none
BROWSER_ONLY=no
BOOTPROTO=dhcp
DEFROUTE=yes
IPV4_FAILURE_FATAL=no
IPV6INIT=yes
IPV6_AUTOCONF=yes
IPV6_DEFROUTE=yes
IPV6_FAILURE_FATAL=no
IPV6_ADDR_GEN_MODE=stable-privacy
NAME=enp0s3
UUID=fc289d60-31ad-4d3c-a668-14d7445efa41
DEVICE=enp0s3
ONBOOT=no
2. 靜態 IP 位址
TYPE=Ethernet
PROXY_METHOD=none
BROWSER_ONLY=no
BOOTPROTO=static
DEFROUTE=yes
IPV4_FAILURE_FATAL=no
IPV6INIT=yes
IPV6_AUTOCONF=yes
IPV6_DEFROUTE=yes
IPV6_FAILURE_FATAL=no
IPV6_ADDR_GEN_MODE=stable-privacy
NAME=enp0s3
UUID=fc289d60-31ad-4d3c-a668-14d7445efa41
DEVICE=enp0s3
ONBOOT=yes
IPADDR=192.168.56.10
GATEWAY=102.168.56.1
NETWORK=192.168.56.0
NETMASK=255.255.255.0
DNS1=8.8.8.8
DNS2=9.9.9.9
BOOTPROTO:IP 取得方式,static 代表靜態 IP 位址,dhcp 代表動態取得 IP 位址。
ONBOOT:設定為 yes 代表開機自動啟動此網路介面。
IPADDR:IP 位址。
GATEWAY:預設閘道。
NETWORK:網路的位址。
NETMASK:網路遮罩。
DNS1:第一台 DNS 伺服器。
DNS2:第二台 DNS 伺服器。
參考
https://blog.gtwang.org/linux/centos-linux-static-network-configuration-tutorial/
2019年11月22日 星期五
NIS+NFS安裝
NIS:
http://linux.vbird.org/linux_server/zspace/new0430nis.php
https://qizhanming.com/blog/2018/08/08/how-to-install-nfs-on-centos-7
http://it001.pixnet.net/blog/post/324192967-it%e4%ba%8b%e4%bb%b6%e7%b0%bf-%e5%bb%ba%e5%80%8bnis%e6%9c%8d%e5%8b%99%e5%90%a7
http://lms.ctl.cyut.edu.tw/course_open.php?courseID=14406&f=open_doc&cid=618753
https://www.server-world.info/en/note?os=CentOS_7&p=nis&f=2
NFS:
http://it001.pixnet.net/blog/post/324341236-it%E5%B0%88%E6%A1%88-%E5%BB%BA%E5%80%8B%E9%9B%86%E4%B8%AD%E5%B8%B3%E8%99%9F%E6%8E%A7%E7%AE%A1%E4%BC%BA%E6%9C%8D%E5%99%A8%E5%90%A7%3Cnis%2Bnfs%3E-%E4%B8%8B
http://blog.ilc.edu.tw/blog/index.php?op=printView&articleId=682710&blogId=25793
https://blog.51cto.com/395469372/2315339
yum install openssh*
vi /etc/ssh/sshd_config
http://www3.sips.ntpc.edu.tw/wordpress/?p=3481
主機如果重開機,先把網路線拔掉,等
$ systemctl start ypbind
$ systemctl enable ypbind
輸入完再插網路線,否則會當機
ipv6禁用導致rpcbind服務啟動失敗實例
https://www.itread01.com/content/1552654687.html
在/etc/hosts.allow中新增允許客戶端訪問的規則 ALL: 127.0.0.1 #允許本機訪問本機所有服務程序
mountd: 192.168.1.0/255.255.255.0
rpcbind: 192.168.1.0/255.255.255.0
sshd: 192.168.1.0/255.255.255.0 #允許192.168.100.網段的IP訪問伺服器上的sshd程序
#允許外網的IP訪問這個伺服器上的sshd程序
sshd: 140.112.22.228 140.112.22.229 140.112.22.230
sshd: 140.112.23.171 140.112.23.172 140.112.23.173
sshd: 140.112.23.171 140.112.23.172 140.112.23.173
sshd: 140.112.23.174 140.112.23.176 140.112.23.236
#httpd: ALL
#vsftpd: ALL
$ vi /etc/hosts
127.0.0.1 localhost localhost.localdomain localhost4 localhost4.localdomain4
::1 localhost localhost.localdomain localhost6 localhost6.localdomain6
192.168.1.2 hostname.domain hostname
$ systemctl restart network.service
$ cat /etc/hosts
# Do not remove the following line, or various programs
# that require network functionality will fail.
127.0.0.1 localhost.localdomain localhost
# 主機的 IP 主機的名稱 主機的別名
主機名稱: 通常是使用完整的網域名稱,也就是主機名稱加上網域名稱
'abrt-cli status' timed out
$ abrt-auto-reporting enabled
bash-4.2#
https://jingyan.baidu.com/article/c45ad29c76cdf5051653e243.html
Centos 7 安裝
https://kevinzjy.github.io/2019/06/14/CentOS_Gridview/
TORQUE安裝筆記
http://cypresslin.web.fc2.com/Memo/M-TORQUEInst.html
https://www.cnblogs.com/zhaosongbin/p/8492470.html
https://blog.csdn.net/Dream_angel_Z/article/details/44225669
https://www.itread01.com/content/1549029626.html
https://wenku.baidu.com/view/06d7cbce0508763231121265.html
官網
http://docs.adaptivecomputing.com/torque/3-0-5/index.php
GPU:
http://docs.adaptivecomputing.com/torque/3-0-5/3.7schedulinggpus.php
pbs_sched: Cannot assign requested address (99) in main, bind
modify:
127.0.0.1 node01.yjsheng.edu node01 localhost localhost.localdomain localhost4 localhost4.localdomain4
qsub: Job rejected by all possible destinations
不能用root submit job
Bad UID for job execution REJHOST=node03.yjsheng. edu MSG=cannot find user 'chiustin' in password file
$ vi /etc/nsswitch.conf
passwd: files nis nisplus
shadow: files nis nisplus
group: files nis nisplus
hosts: files nis dns
2019年11月14日 星期四
2019年11月13日 星期三
2019年11月12日 星期二
2019年11月10日 星期日
2019年11月9日 星期六
2019年11月8日 星期五
2019年11月7日 星期四
2019年11月5日 星期二
2019年11月1日 星期五
2019年10月31日 星期四
2019年10月30日 星期三
2019年10月29日 星期二
2019年10月28日 星期一
2019年10月27日 星期日
Windows install RDkit Tensorflow Keras
1.安裝RDkit
打開Anaconda3 Prompt (Anaconda3)終端機
$ conda create -c rdkit -n my-rdkit-env rdkit python=3.7
$ conda activate my-rdkit-env
create -c rdkit -n my-rdkit-env意思是在Windows Anaconda3環境裡產生一個名叫my-rdkit-env的環境,因為tensorflow只支援Python3.7,所以在最後還要輸入python=3.7代表在my-rdkit-env環境下是使用python=3.7,接著就可以依序安裝tensorflow跟Keras了!
2.在my-rdkit-env環境下安裝tensorflow2.0
$ conda install tensorflow-gpu=2.0 python=3.7
3.在my-rdkit-env環境下安裝Keras
$ conda install Keras
4.在my-rdkit-env環境下安裝jupyter notebook
$ conda install jupyter
5.安裝CUDA
因為RDkit只支援CUDA 10.0,所以到下面連結下載CUDA 10.0
https://developer.nvidia.com/cuda-toolkit-archiv
2019年10月26日 星期六
Centos關閉mail
Method 1:
$ echo "unset MAILCHECK" >> /etc/profile
$ source /etc/profile
參考
Method 2:
$ vi /etc/crontab
MAILTO=""
參考
Centos在/var/spool/mail/root出現Cannot open /var/log/sa/sa*: No such file or directory
問題:
主機會發出/var/spool/mail/root訊息,裡面顯示Cannot open /var/log/sa/sa*: No such file or directory
解決:
$ cd /var/log
$ rm -r sa #刪掉舊的sa資料夾後執行
$ mkdir sa
$ sar -o 26 (26是當天日期)
參考
https://www.twblogs.net/a/5b8fdeeb2b7177672215e6c4
主機會發出/var/spool/mail/root訊息,裡面顯示Cannot open /var/log/sa/sa*: No such file or directory
解決:
$ cd /var/log
$ rm -r sa #刪掉舊的sa資料夾後執行
$ mkdir sa
$ sar -o 26 (26是當天日期)
參考
https://www.twblogs.net/a/5b8fdeeb2b7177672215e6c4
2019年10月25日 星期五
Learning to Smell: Using Deep Learning to Predict the Olfactory Properties of Molecules
goole blog:
https://ai.googleblog.com/2019/10/learning-to-smell-using-deep-learning.html?fbclid=IwAR3sA1E-FwO5No9rvINTdTbKusnAzlxV3x9mbBRJ88GoV3JcE4J0J73xDvE
bangqu in Chinese
https://bangqu.com/FX9978.html?utm_source=Facebook_PicSee&fbclid=IwAR0d_0Slk0-Ka8R5WGTPOIbmhdS0ZMBqFDSjvNifh4zqWA4n6KJPwM0IRIU
paper:
https://arxiv.org/pdf/1910.10685.pdf
2019年10月23日 星期三
2019年10月22日 星期二
2019年10月21日 星期一
2019年10月20日 星期日
Keras建立custom loss function以及load_model時怎麼呼叫custom loss function
本文介紹訓練神經網路如果是使用客制化的loss function,訓練完後要如何使用load_model呼叫
2019年10月19日 星期六
On the use of the Kullback–Leibler divergence in Variational Autoencoders
可變自動編碼器(VAE)的loss function可以分為兩部分。第一個測量autoencoding的量,即原始樣本與其重構之間的誤差。第二個是有關standard multivariate normal distribution的Kullback-Leibler散度(縮寫為KL散度)。我們將畫圖說明KL散度對encoder 和decoder 輸出的影響。
2019年10月18日 星期五
2019年10月16日 星期三
VAE code
VAE published in ACS Cent. Sci.
https://github.com/aspuru-guzik-group/chemical_vae
Explicit hyperparameter:
https://github.com/maxhodak/keras-molecules
Generating sentences:
http://alexadam.ca/ml/2017/05/05/keras-vae.html?
https://github.com/alexeyev/Keras-Generating-Sentences-from-a-Continuous-Space
https://github.com/psipred/protein-vae
https://github.com/bojone/vae (GCNN)
Protein sequence:
https://github.com/samsinai/VAE_protein_function/blob/master/VAE_for_protein_function_prediction.ipynb
https://github.com/psipred/protein-vae
https://gitlab.com/PhazCode/DeepProteinDesign/tree/master
GAN+RL for Generative-Molecules:
https://github.com/chennnnnyize/Generative-Molecules
2019年10月15日 星期二
Why is my validation loss lower than my training loss?
2019年10月13日 星期日
2019年10月11日 星期五
LSTM Arguments設定input_shape
為何在Keras Document裡面的Arguments明明沒有input_shape,可是常常會看到有人使用呢?如下所示:
model.add(LSTM(32, input_shape=(10, 64)))
這是因為LSTM是keras.engine.base_layer.wrapped_fn()抽像類別的子類別,所有的循環層(LSTM,GRU,SimpleRNN)都繼承本層,因此下面的參數可以在任何循環層中使用。
參考
https://keras.io/layers/recurrent/
https://keras-cn.readthedocs.io/en/latest/layers/recurrent_layer/
model.add(LSTM(32, input_shape=(10, 64)))
這是因為LSTM是keras.engine.base_layer.wrapped_fn()抽像類別的子類別,所有的循環層(LSTM,GRU,SimpleRNN)都繼承本層,因此下面的參數可以在任何循環層中使用。
- cell: A RNN cell instance. A RNN cell is a class that has:
- a
call(input_at_t, states_at_t)method, returning(output_at_t, states_at_t_plus_1). The call method of the cell can also take the optional argumentconstants, see section "Note on passing external constants" below. - a
state_sizeattribute. This can be a single integer (single state) in which case it is the size of the recurrent state (which should be the same as the size of the cell output). This can also be a list/tuple of integers (one size per state). - a
output_sizeattribute. This can be a single integer or a TensorShape, which represent the shape of the output. For backward compatible reason, if this attribute is not available for the cell, the value will be inferred by the first element of thestate_size.
It is also possible forcellto be a list of RNN cell instances, in which cases the cells get stacked one after the other in the RNN, implementing an efficient stacked RNN. - a
- return_sequences: Boolean. Whether to return the last output in the output sequence, or the full sequence.
- return_state: Boolean. Whether to return the last state in addition to the output.
- go_backwards: Boolean (default False). If True, process the input sequence backwards and return the reversed sequence.
- stateful: Boolean (default False). If True, the last state for each sample at index i in a batch will be used as initial state for the sample of index i in the following batch.
- unroll: Boolean (default False). If True, the network will be unrolled, else a symbolic loop will be used. Unrolling can speed-up a RNN, although it tends to be more memory-intensive. Unrolling is only suitable for short sequences.
- input_dim: dimensionality of the input (integer). This argument (or alternatively, the keyword argument
input_shape) is required when using this layer as the first layer in a model. - input_length: Length of input sequences, to be specified when it is constant. This argument is required if you are going to connect
FlattenthenDenselayers upstream (without it, the shape of the dense outputs cannot be computed). Note that if the recurrent layer is not the first layer in your model, you would need to specify the input length at the level of the first layer (e.g. via theinput_shapeargument)
參考
https://keras.io/layers/recurrent/
https://keras-cn.readthedocs.io/en/latest/layers/recurrent_layer/
2019年10月10日 星期四
Variational Autoencoder: Intuition and Implementation
目前對於數據生成的神經網路架構存在兩種並駕齊驅的生成模型:生成對抗網絡(GAN)和變異自編碼器(VAE)。 這兩種模型的訓練方式相當不同。 GAN來自於game theory,其目標是找到discriminator網絡與generator 網絡之間的Nash Equilibrium。 另一方面,VAE來自於bayesian inference,也就是建立數據的基本機率分佈模型,以便可以從該分佈中採樣新數據。
在本文中,我們將直觀地研究VAE模型及其在Keras中的實現。
在本文中,我們將直觀地研究VAE模型及其在Keras中的實現。
Keras implementation of an LSTM neural network to classify and predict the MINST dataset
這篇將會針對經常用於時間序列數據進行分類的神經網路LSTM對2D數據進行分類,例如手寫字母的圖像來進行討論。
2019年10月8日 星期二
2019年10月7日 星期一
2019年10月6日 星期日
RDKit指令
1. MolFromSmiles
mol = Chem.MolFromSmiles('C(C)CC')
print(mol)

將SMILE轉成Mol格式,可以使用在像是fingerprint的引數
fp1 = MACCSkeys.GenMACCSKeys(mol)
https://blog.csdn.net/u012325865/article/details/81784517
2. MolToSmiles
smi = Chem.MolToSmiles(mol)
print(smi)

可以將Mol格式轉成SMILE
3. Canonicalization
Chem.MolToSmiles(Chem.MolFromSmiles(smi), isomericSmiles=True, canonical=True)
在大多數情況下,對於同一結構,可能有許多SMILES字符串。Canonicalization是將所有可能的SMILES字串轉換成一種canonical SMILES。假設您要在dataset中查找是否已經存在某結構。使用canonical SMILES代替2-d圖形結構可以將問題簡化為簡單的文本匹配問題。從dataset中每個化合物的canonical SMILES,並將查詢的結構轉換為其canonical SMILES。如果該SMILES不存在,代表它會是一個新的結構。
https://ctr.fandom.com/wiki/Convert_a_SMILES_string_to_canonical_SMILES
4.
mol = Chem.MolFromSmiles('C(C)CC')
print(mol)
將SMILE轉成Mol格式,可以使用在像是fingerprint的引數
fp1 = MACCSkeys.GenMACCSKeys(mol)
https://blog.csdn.net/u012325865/article/details/81784517
2. MolToSmiles
smi = Chem.MolToSmiles(mol)
print(smi)
可以將Mol格式轉成SMILE
3. Canonicalization
Chem.MolToSmiles(Chem.MolFromSmiles(smi), isomericSmiles=True, canonical=True)
在大多數情況下,對於同一結構,可能有許多SMILES字符串。Canonicalization是將所有可能的SMILES字串轉換成一種canonical SMILES。假設您要在dataset中查找是否已經存在某結構。使用canonical SMILES代替2-d圖形結構可以將問題簡化為簡單的文本匹配問題。從dataset中每個化合物的canonical SMILES,並將查詢的結構轉換為其canonical SMILES。如果該SMILES不存在,代表它會是一個新的結構。
https://ctr.fandom.com/wiki/Convert_a_SMILES_string_to_canonical_SMILES
4.
ubuntu 18.04 install RDKit
1. 建立rdkit環境
$ conda create -c rdkit -n my-rdkit-env rdkit
2. 到anaconda3的bin資料夾
$ cd anaconda3/bin
3. 安裝conda-foerg rdkit
$ conda install -c conda-forge rdkit
4. 安裝cmake cairo pillow eigen pkg-config
$ conda install -y cmake cairo pillow eigen pkg-config
5. 安裝boost-cpp boost py-boost
$ conda install -y boost-cpp boost py-boost
$ conda update -n base -c defaults conda
6. 安裝gxx_linux-64
$ conda install -y gxx_linux-64
7. 複製rdkit資料夾到家目錄
$ cd
$ sudo apt install git
$ git clone https://github.com/rdkit/rdkit.git
8. 進入rdkit資料夾
$ cd rdkit
9. 產升build資料夾
$ mkdir build
10. 進入build資料夾
$ cd build
11. cmake (切記這邊一定要注意你的Python是哪個版本)
$ cmake .. -DPy_ENABLE_SHARED=1 -DRDK_INSTALL_INTREE=ON -DRDK_INSTALL_STATIC_LIBS=OFF -DRDK_BUILD_CPP_TESTS=ON -DPYTHON_NUMPY_INCLUDE_PATH="$CONDA_PREFIX/lib/python3.7/site-packages/numpy/core/include" -DBOOST_ROOT="$CONDA_PREFIX"
12. 在my-rdkit-env環境建立include numpy
否則會發生fatal error: numpy/arrayobject.h: No such file or directory #include <numpy/arrayobject.h>
12. make以及make install
$ make
$ make install
參考
http://www.rdkit.org/docs/Install.html
$ conda create -c rdkit -n my-rdkit-env rdkit
2. 到anaconda3的bin資料夾
$ cd anaconda3/bin
3. 安裝conda-foerg rdkit
$ conda install -c conda-forge rdkit
4. 安裝cmake cairo pillow eigen pkg-config
$ conda install -y cmake cairo pillow eigen pkg-config
5. 安裝boost-cpp boost py-boost
$ conda install -y boost-cpp boost py-boost
$ conda update -n base -c defaults conda
6. 安裝gxx_linux-64
$ conda install -y gxx_linux-64
7. 複製rdkit資料夾到家目錄
$ cd
$ sudo apt install git
$ git clone https://github.com/rdkit/rdkit.git
8. 進入rdkit資料夾
$ cd rdkit
9. 產升build資料夾
$ mkdir build
10. 進入build資料夾
$ cd build
11. cmake (切記這邊一定要注意你的Python是哪個版本)
$ cmake .. -DPy_ENABLE_SHARED=1 -DRDK_INSTALL_INTREE=ON -DRDK_INSTALL_STATIC_LIBS=OFF -DRDK_BUILD_CPP_TESTS=ON -DPYTHON_NUMPY_INCLUDE_PATH="$CONDA_PREFIX/lib/python3.7/site-packages/numpy/core/include" -DBOOST_ROOT="$CONDA_PREFIX"
12. 在my-rdkit-env環境建立include numpy
否則會發生fatal error: numpy/arrayobject.h: No such file or directory #include <numpy/arrayobject.h>
$ which python3
/home/chiustin/anaconda3/envs/my-rdkit-env/bin/python3
$ cd /home/chiustin/anaconda3/envs/my-rdkit-env/include
$ mkdir numpy
$ cd numpy
$ cp /usr/include/numpy/* .
12. make以及make install
$ make
$ make install
參考
http://www.rdkit.org/docs/Install.html
2019年10月5日 星期六
Develop/integrate molecular modeling algorithms in SAMSON with the SAMSON SDK (C++/Qt)
Installation guide
https://documentation.samson-connect.net/users/latest/user_guide_getting_started.html#InstallingSAMSON
Quick start guide
https://documentation.samson-connect.net/wp-content/uploads/SAMSON-Quick-Start-Guide.pdf
User guide
https://documentation.samson-connect.net/users/latest/
Scripting guide
https://documentation.samson-connect.net/scripting-guide/
Documentation center
https://documentation.samson-connect.net
Forum
2019年10月4日 星期五
2019年10月2日 星期三
2019年9月28日 星期六
2019年9月27日 星期五
ubuntu 18.04 nvidia-driver-435 E: Unable to correct problems, you have held broken packages.

這是因為顯卡驅動沒有清除乾淨,所以如果要用sudo ubuntu-drivers autoinstall安裝顯卡驅動之前要在終端機先執行以下指令
$ sudo apt remove --purge nvidia*
參考
https://ubuntuforums.org/showthread.php?t=2417585
2019年9月25日 星期三


2019年9月24日 星期二
2019年9月23日 星期一
2019年9月22日 星期日
2019年9月21日 星期六
ubuntu 18.04 install tensorflow 1.14.0
安裝tensorflow之前要先確認python3、pip、pip3的環境設定,由於我們在執行tensorflow或Keras都是呼叫python3,所以我們必須確認pip、pip3哪個環境設定是和python3相同,否則在安裝tensorflow以及Keras會發生找不到Module的情形發生。
ubuntu 18.04 install cuDNN
NVIDIACUDA®深度神經網路函式庫(cuDNN)是GPU加速的用於深度神經網絡的原語庫。 cuDNN在執行上提供了高度優化的能力,像是在forward和backward卷積,池化,normalization和activation layers。以下是安裝流程:
2019年9月20日 星期五
PBS
鳥哥 簡易 Cluster 架設
http://linux.vbird.org/linux_server/0600cluster.php
鳥哥的 Linux 私房菜 -- 伺服器架設篇目錄http://linux.vbird.org/linux_server/index_old.php
Centos 7詳細網站
https://www.server-world.info/en/note?os=CentOS_7&p=nis&f=1
CentOS下torque集群配置
https://blog.csdn.net/Dream_angel_Z/article/details/44225669
https://blog.csdn.net/Dream_angel_Z/article/details/44225713
https://blog.csdn.net/Dream_angel_Z/article/details/44226055?locationNum=8&fps=1
https://blog.csdn.net/dream_angel_z/article/details/44226179
PBS script
https://csc.cnsi.ucsb.edu/docs/example-scripts-running-jobs
NFS為Network File System,可以把本地的目錄共享給指定IP域的主機,想要訪問共享目錄的主機可以將共享目錄掛在到本地進行直接訪問
http://linux.vbird.org/linux_server/0330nfs.php
https://qizhanming.com/blog/2018/08/08/how-to-install-nfs-on-centos-7
NIS為Network Information Service,可以為多態用戶創建統一的用戶登錄機制,使多個主機可以使用相同的用戶登錄到網絡中,對共享目錄進行讀寫操作
http://linux.vbird.org/linux_server/0430nis.php
https://blog.csdn.net/younger_china/article/details/53130780
RSH
在我們的 Linux 主機上面工作,通常使用 BASH 這個 shell 來傳達給 kernel 工作的訊息,以使主機正確的工作;而如果在不同的主機之間,那就可以使用 R Shell 來進行指令的下達喔,如此一來,我們就可以直接在 A 機器,向 B 機器下達工作的指令,而不需要登入 B 機器呢~那就是 RSH 的主要功能啦!最常見的 RSH 指令就是 rcp 與 rsh 了!有興趣的朋友應該知道以 man 來查尋一下該指令的用法囉!
需要附帶一提的是,這個 RSH 是『相當危險』的一個服務喔!由於我們可以直接登入 RSH 主機,並且在上面進行指令的下達,為了避免還要輸入密碼的問題,因此通常 RSH 已經將信任主機設定好了,不過,由於 RSH 會啟動一些 port 來監聽 Clients 的需求,而偏偏這些 port 與 daemon 都還挺危險的,因此,『Cluster 最好是設定在內部網域當中,並使用私有 IP ,比較能夠避免危險』喔!此外,那個 Master 也必須要設定好一定程度的嚴密防火牆喔!
http://linux.vbird.org/linux_server/0600cluster.php
Installing Torque 6.0.1 on CentOS 7
https://www.webmo.net/support/torque.html
Centos下搭建MPI集群計算環境
https://www.iczc.me/post/building-an-MPI-cluster-with-Centos/
https://www.webmo.net/support/torque.html
https://www.wandouip.com/t5i267150/
http://blog.sciencenet.cn/blog-548899-720364.html
http://staff.pccu.edu.tw/~lchou/reference/cluster_doc/ClusteringQueueingSystem(Cmeta).pdf
https://wiki.archlinux.org/index.php/TORQUE#NFS
http://linux.vbird.org/linux_server/0600cluster.php
鳥哥的 Linux 私房菜 -- 伺服器架設篇目錄http://linux.vbird.org/linux_server/index_old.php
Centos 7詳細網站
https://www.server-world.info/en/note?os=CentOS_7&p=nis&f=1
CentOS下torque集群配置
https://blog.csdn.net/Dream_angel_Z/article/details/44225669
https://blog.csdn.net/Dream_angel_Z/article/details/44225713
https://blog.csdn.net/Dream_angel_Z/article/details/44226055?locationNum=8&fps=1
https://blog.csdn.net/dream_angel_z/article/details/44226179
PBS script
https://csc.cnsi.ucsb.edu/docs/example-scripts-running-jobs
NFS為Network File System,可以把本地的目錄共享給指定IP域的主機,想要訪問共享目錄的主機可以將共享目錄掛在到本地進行直接訪問
http://linux.vbird.org/linux_server/0330nfs.php
https://qizhanming.com/blog/2018/08/08/how-to-install-nfs-on-centos-7
NIS為Network Information Service,可以為多態用戶創建統一的用戶登錄機制,使多個主機可以使用相同的用戶登錄到網絡中,對共享目錄進行讀寫操作
http://linux.vbird.org/linux_server/0430nis.php
https://blog.csdn.net/younger_china/article/details/53130780
RSH
在我們的 Linux 主機上面工作,通常使用 BASH 這個 shell 來傳達給 kernel 工作的訊息,以使主機正確的工作;而如果在不同的主機之間,那就可以使用 R Shell 來進行指令的下達喔,如此一來,我們就可以直接在 A 機器,向 B 機器下達工作的指令,而不需要登入 B 機器呢~那就是 RSH 的主要功能啦!最常見的 RSH 指令就是 rcp 與 rsh 了!有興趣的朋友應該知道以 man 來查尋一下該指令的用法囉!
需要附帶一提的是,這個 RSH 是『相當危險』的一個服務喔!由於我們可以直接登入 RSH 主機,並且在上面進行指令的下達,為了避免還要輸入密碼的問題,因此通常 RSH 已經將信任主機設定好了,不過,由於 RSH 會啟動一些 port 來監聽 Clients 的需求,而偏偏這些 port 與 daemon 都還挺危險的,因此,『Cluster 最好是設定在內部網域當中,並使用私有 IP ,比較能夠避免危險』喔!此外,那個 Master 也必須要設定好一定程度的嚴密防火牆喔!
http://linux.vbird.org/linux_server/0600cluster.php
Installing Torque 6.0.1 on CentOS 7
https://www.webmo.net/support/torque.html
Centos下搭建MPI集群計算環境
https://www.iczc.me/post/building-an-MPI-cluster-with-Centos/
https://www.webmo.net/support/torque.html
https://www.wandouip.com/t5i267150/
http://blog.sciencenet.cn/blog-548899-720364.html
http://staff.pccu.edu.tw/~lchou/reference/cluster_doc/ClusteringQueueingSystem(Cmeta).pdf
https://wiki.archlinux.org/index.php/TORQUE#NFS
2019年9月17日 星期二
2019年9月16日 星期一
Generating Molecules with the Help of Recurrent Neural Networks
傳統藥物開發分兩個階段進行; 發現階段和發展階段。 一旦發現某種疾病的目標或根本原因/機制,我們需要識別化合物並驗證這些化合物是否可以阻止或抑制這些疾病的活動。 對於每5000種化合物測試,只有一種具有初始的積極效果,對於那些我們對其毒性或其他生理化學特徵沒有基本了解的化合物。 這使得工作漫長而艱鉅,幾乎沒有結果。 與此同時,數百萬人正在死於這些疾病。 這主要是因為為什麼投資大多數製藥公司不如將您的儲蓄存入高息賬戶。
但是,我們如何嘗試加速我們識別某些目標效應的化合物的方式? 在這種情況下,這就是生成網絡領域迅速普及,以幫助使用諸如RNN之類的網絡生成新分子的地方。 目標是通過去除盡可能多的過程來加速發現階段的過程,我們必須通過重新藥物設計(de novo drug design)手動測試大量化合物來識別有效的化合物。
Project De Novo: Generating Novel Molecules
Each colour corresponds to a sequence of characters in a SMILES string
本文目標是使用遞歸神經網絡(RNN)生成新的分子。 De novo僅僅意味著從更簡單的分子合成新的複雜分子。 然而,有一個主要的警告:我們不知道這些分子有多麼有用,甚至它們的正確性,但在本文的最後會提到我們可以擴展這個模型的方法來做到這一點。 我們的想法是訓練模型學習SMILES字串中的模式,以便生成的輸出可以匹配有效的分子。 SMILES只是根據結構和不同組成的分子表示成字串(String),並且有助於讓電腦理解分子表示式。

參考
https://chemistry.stackexchange.com/questions/43299/is-there-a-way-to-use-free-software-to-convert-smiles-strings-to-structures/57358
此外,有個網站也可以將化學結構翻譯成SMILES字串:
https://cactus.nci.nih.gov/
由於我們將文本作為數據提供到RNN神經網絡,因此RNN是用於生成新SMILES字符串的最佳網絡。 大多數論文和研究人員建議使用LSTM增強RNN的內部結構,LSTM是一種更有效訓練文本的神經網路。 因此,我們將使用2 LSTM層,在100,000個SMILES字符串的數據集上進行訓練。
Stage 1 — Mapping
該項目的第一階段是創建一個將字元映射到整數,以便RNN可以處理數據,反之,也可以將結果和輸出轉換回字元時。 我們需要創建一組所有獨特字串,並enumerate(為每個字元定義一個數值)每個項目。 SMILES字串由兩種類型的字元組成,它們是特殊字元,如“/”或“=”,以及元素符號,如“P”,“Si”,“Mg”等。我們將這些enumerate的獨特字元放入一個 獨特的字典,
unique_chars = sorted(list(set(raw_text)))
char_to_int = dict((c, i) for i, c in enumerate(unique_chars))
char_to_int.update({-1 : "\n"})
這裡合併“\ n”表示為.txt文件中的新行。
Stage 2— Data Preprocessing
一旦我們為字元映射創建了字典,我們就會呼叫字典char_to_int將SMILES字串數據集中的每個字元轉換為整數。 Normalization是將字元的每個整數值除以數據集中獨特字元的數量。 然後,我們使用NumPy將輸入陣列X reshape為[樣本,時間步長,生理化學特徵]的三維陣列,這是循環模型的預期輸入格式。 輸出變量Y是one-hot encoding,以在訓練模型後生成新的SMILES。 One-hot encoding適用於整數表示,並且刪除整數編碼變量,並為每個獨特的整數值添加一個新的二進制(0或1)變量。
Stage 3— Model Architecture

The Model Architecture, consisting of two LSTM layers with 256 units (Gupta et al.)
這個系統結構的設計是根據Gupta等人的研究論文“De Novo Drug Design的Generative Recurrent Networks”。採用這種架構,因為它在創建有效的SMILES字串時產生了97%的準確率,而且它是一個非常簡單的架構。它由兩個LSTM層組成,每個層都有一個隱藏的狀態向量H,它透過一個單元傳遞先前的資訊給下一個單元,這是RNN以前從未見過的。像這樣的更多循環連接允許網絡理解SMILES序列的更複雜的依賴性。這些層上使用0.25的壓差正則化,接著是使用softmax激活函數的neutron組成密集輸出層。 Softmax是一個函數,它將K個實數的向量(在我們的例子中是輸出向量Y)作為輸入,並將其normalize為由K個概率組成的概率分佈。
# Create the model (simple 2 layer LSTM)
model = Sequential()
model.add(LSTM(128, input_shape=(X.shape[1], X.shape[2]), return_sequences = True))
model.add(Dropout(0.25))
model.add(LSTM(256, return_sequences = True))
model.add(Dropout(0.25))
model.add(LSTM(512, return_sequences = True))
model.add(Dropout(0.25))
model.add(LSTM(256, return_sequences = True))
model.add(Dropout(0.25))
model.add(LSTM(128))
model.add(Dropout(0.25))
model.add(Dense(Y.shape[1], activation='softmax'))
隨意添加更多層或更改dropout rate,但請記住,在NN(神經網絡)中有更多層和神經元,在計算上它獲得的強度和準確度越高。
Stage 4— Training:
這裡的神經網絡使用categorical cross entropy作為loss function,以及Adam Optimizer。 包含100,000個SMILES字串的數據集=訓練了10個epochs的模型以及512 batch_size來學習。 這裡的經驗法則是更多的epochs +更小的batch_size =更好地理解數據,但代價是需要更長的訓練時間。 我們還可以利用檢查點(checkpoints),它是Keras函式庫中的內建功能來保存我們的訓練進度,以及每個epoch的模型權重,以便稍後傳輸或保存。
Stage 5 — Generating New Molecules:
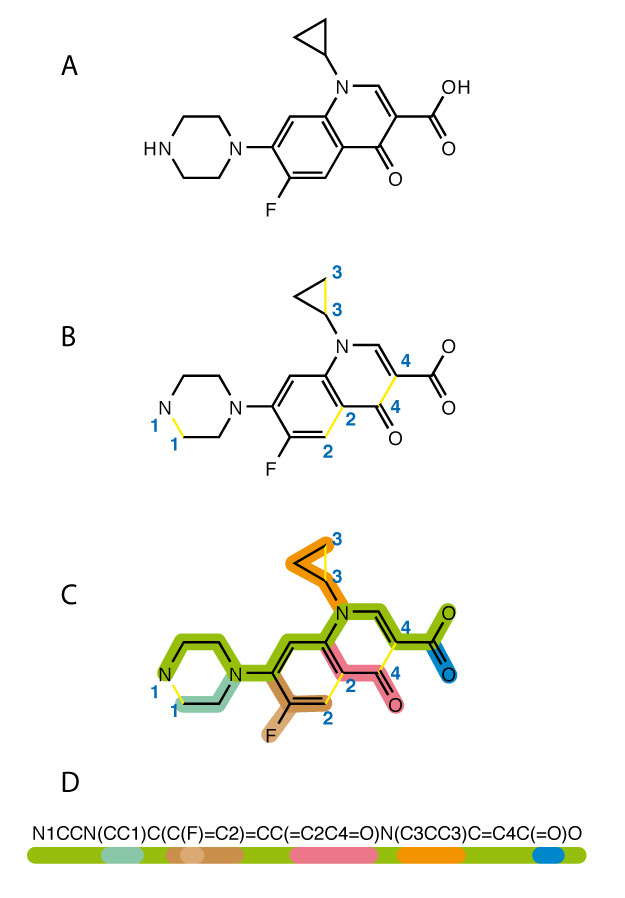
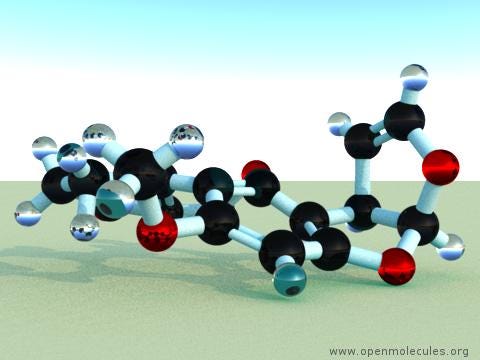
生成新分子相當簡單。 首先,我們加載預先訓練的權重,這樣我們就可以避免每次在生成新的SMILES字串之前訓練模型。 然後,我們從數據集中隨機選擇一個SMILES字串作為參考字串,並在範圍內生成指定數量的字元,並將整數值轉換回字元。 上面的代碼在技術上可以用於生成任何類型的文本,無論是故事,音樂還是SMILES分子。 根據自定義調整,學習速率,數據集大小和quality,結果會有所不同,但最後我們應該得到一種有效的分子表示字串。 在進行學習新的子結構和分支(N1CCN(CC1)C(C(F)=C2…)分子之前,模型可以藉由僅生成一個字符(NNNNNN)的序列開始。
這是分子二維結構 (O1C=C[C@H([C@H]1O2)c3c2cc(OC)c4c3OC(=O)C5=C4CCC(=O)5)

和三維結構:
O1C=C[C@H]([C@H]1O2)c3c2cc(OC)c4c3OC(=O)C5=C4CCC(=O)5
Possible Improvements
1. Checking the Validity of these Molecules:
我們不知道我們生成的分子是否具有任何用例, 我們必須藉由用於訓練的原始分子進行比較來驗證這些生成的分子是否是有效的分子結構。 藉由計算數據的共同生理化學特徵,以及對訓練數據的特徵使用主成分分析(Principal Component Analysis),我們可以確定新生成的分子是否相應地進行了轉換。
2. Are SMILES Strings even the most optimal way to represent molecules?:
如何確信LSTMs可以在最好的情況下生成文本的樣本,因為SMILES字串只是查看分子化學組成的基本方法。 我們可能會創建更好的方法來表示分子的複雜性,以便將來進行更準確的測試。 然而,目前,SMILES Strings和RNN是使用機器學習產生分子的規範。
3. The Dataset: Through data augmentation
我們可以採用不同SMILES字串的排列,並將它們添加到我們的數據集中。 增加數據集的另一種方法是enumerate SMILES字符串超出其原始形式,或以其他方式編寫。

Changing Drug Discovery: Fragment-Based Drug Discovery (FBDD)

這種產生分子的方法的主要用途之一是基於片段的藥物發現或FBDD。 這是在不使用哨兵(使用其存在作為終止條件的特殊值或特徵)開始輸入的地方,我們可以從已知結合目標疾病機制的片段開始。 通過將這個片段的SMILES字串作為輸入,我們可以用RNN逐漸“生長”分子的其餘部分,從而產生更有效地抵消某種功能的分子! 這種方法肯定有很多希望,並且看起來將來會被更多地使用會很有趣。
Conclusion + Key Takeaways
RNN僅使用數據集上的少量參數來提供了一種簡單而有效的分子生成方法。 該領域的大多數研究都希望結合RL或對抗性訓練等結構,以幫助增加產生的有效分子的數量,或使模型偏向於創造具有特定藥物某些特性的分子。 希望在未來採用這種方法,基於片段的藥物發現變得更加普遍,並有助於使藥物開發更加可行和經濟。 AI是移除創造療法的猜測的關鍵。
Key Takeaways
1. 緩慢而昂貴的藥物開發和材料科學研究是目前方法進展緩慢的直接結果
2. 使用機器學習,我們可以提高研發的速度。
3. 機器學習用於生成分子的最有效用途是使用RNN和SMILES分子字符串表示,但它們不是最佳方式。
4. 我們還有很長的路要走,才能使用人工智能以更快的速度製作更準確有效的分子結構,但還有很多值得期待的東西!
https://towardsdatascience.com/generating-molecules-with-the-help-of-recurrent-neural-networks-c3fe23bd0de2
但是,我們如何嘗試加速我們識別某些目標效應的化合物的方式? 在這種情況下,這就是生成網絡領域迅速普及,以幫助使用諸如RNN之類的網絡生成新分子的地方。 目標是通過去除盡可能多的過程來加速發現階段的過程,我們必須通過重新藥物設計(de novo drug design)手動測試大量化合物來識別有效的化合物。
Project De Novo: Generating Novel Molecules
Each colour corresponds to a sequence of characters in a SMILES string
本文目標是使用遞歸神經網絡(RNN)生成新的分子。 De novo僅僅意味著從更簡單的分子合成新的複雜分子。 然而,有一個主要的警告:我們不知道這些分子有多麼有用,甚至它們的正確性,但在本文的最後會提到我們可以擴展這個模型的方法來做到這一點。 我們的想法是訓練模型學習SMILES字串中的模式,以便生成的輸出可以匹配有效的分子。 SMILES只是根據結構和不同組成的分子表示成字串(String),並且有助於讓電腦理解分子表示式。
from rdkit import Chem
from rdkit.Chem import Draw

import matplotlib.pyplot as plt
%matplotlib inline

penicillin_g_smiles = 'CC1([C@@H](N2[C@H](S1)[C@@H](C2=O)NC(=O)Cc3ccccc3)C(=O)O)C'

penicillin_g = Chem.MolFromSmiles(penicillin_g_smiles)

Draw.MolToMPL(penicillin_g, size=(200, 200))
參考
https://chemistry.stackexchange.com/questions/43299/is-there-a-way-to-use-free-software-to-convert-smiles-strings-to-structures/57358
此外,有個網站也可以將化學結構翻譯成SMILES字串:
https://cactus.nci.nih.gov/
由於我們將文本作為數據提供到RNN神經網絡,因此RNN是用於生成新SMILES字符串的最佳網絡。 大多數論文和研究人員建議使用LSTM增強RNN的內部結構,LSTM是一種更有效訓練文本的神經網路。 因此,我們將使用2 LSTM層,在100,000個SMILES字符串的數據集上進行訓練。
Stage 1 — Mapping
該項目的第一階段是創建一個將字元映射到整數,以便RNN可以處理數據,反之,也可以將結果和輸出轉換回字元時。 我們需要創建一組所有獨特字串,並enumerate(為每個字元定義一個數值)每個項目。 SMILES字串由兩種類型的字元組成,它們是特殊字元,如“/”或“=”,以及元素符號,如“P”,“Si”,“Mg”等。我們將這些enumerate的獨特字元放入一個 獨特的字典,
unique_chars = sorted(list(set(raw_text)))
char_to_int = dict((c, i) for i, c in enumerate(unique_chars))
char_to_int.update({-1 : "\n"})
這裡合併“\ n”表示為.txt文件中的新行。
Stage 2— Data Preprocessing
一旦我們為字元映射創建了字典,我們就會呼叫字典char_to_int將SMILES字串數據集中的每個字元轉換為整數。 Normalization是將字元的每個整數值除以數據集中獨特字元的數量。 然後,我們使用NumPy將輸入陣列X reshape為[樣本,時間步長,生理化學特徵]的三維陣列,這是循環模型的預期輸入格式。 輸出變量Y是one-hot encoding,以在訓練模型後生成新的SMILES。 One-hot encoding適用於整數表示,並且刪除整數編碼變量,並為每個獨特的整數值添加一個新的二進制(0或1)變量。
Stage 3— Model Architecture
The Model Architecture, consisting of two LSTM layers with 256 units (Gupta et al.)
這個系統結構的設計是根據Gupta等人的研究論文“De Novo Drug Design的Generative Recurrent Networks”。採用這種架構,因為它在創建有效的SMILES字串時產生了97%的準確率,而且它是一個非常簡單的架構。它由兩個LSTM層組成,每個層都有一個隱藏的狀態向量H,它透過一個單元傳遞先前的資訊給下一個單元,這是RNN以前從未見過的。像這樣的更多循環連接允許網絡理解SMILES序列的更複雜的依賴性。這些層上使用0.25的壓差正則化,接著是使用softmax激活函數的neutron組成密集輸出層。 Softmax是一個函數,它將K個實數的向量(在我們的例子中是輸出向量Y)作為輸入,並將其normalize為由K個概率組成的概率分佈。
# Create the model (simple 2 layer LSTM)
model = Sequential()
model.add(LSTM(128, input_shape=(X.shape[1], X.shape[2]), return_sequences = True))
model.add(Dropout(0.25))
model.add(LSTM(256, return_sequences = True))
model.add(Dropout(0.25))
model.add(LSTM(512, return_sequences = True))
model.add(Dropout(0.25))
model.add(LSTM(256, return_sequences = True))
model.add(Dropout(0.25))
model.add(LSTM(128))
model.add(Dropout(0.25))
model.add(Dense(Y.shape[1], activation='softmax'))
隨意添加更多層或更改dropout rate,但請記住,在NN(神經網絡)中有更多層和神經元,在計算上它獲得的強度和準確度越高。
Stage 4— Training:
這裡的神經網絡使用categorical cross entropy作為loss function,以及Adam Optimizer。 包含100,000個SMILES字串的數據集=訓練了10個epochs的模型以及512 batch_size來學習。 這裡的經驗法則是更多的epochs +更小的batch_size =更好地理解數據,但代價是需要更長的訓練時間。 我們還可以利用檢查點(checkpoints),它是Keras函式庫中的內建功能來保存我們的訓練進度,以及每個epoch的模型權重,以便稍後傳輸或保存。
# Define checkpoints (used to save the weights at each epoch, so that the model doesn't need to be retrained)
filepath="weights-improvement-{epoch:02d}-{loss:.4f}.hdf5"checkpoint = ModelCheckpoint(filepath, monitor = 'loss', verbose = 1, save_best_only = True, mode = 'min')
callbacks_list = [checkpoint] # Fit the model
model.fit(X, Y, epochs = 19, batch_size = 512, callbacks = callbacks_list) """TO TRAIN FROM SAVED CHECKPOINT"""
# Load weights
model.load_weights("weights-improvement-75-1.8144.hdf5") # load the model
new_model = load_model ("model.h5") assert_allclose(model.predict(x_train),new_model.predict(x_train), 1e-5) # fit the model
checkpoint = ModelCheckpoint(filepath, monitor='loss', verbose=1, save_best_only=True, mode='min')
callbacks_list = [checkpoint]new_model.fit(x_train, y_train, epochs = 100, batch_size = 64, callbacks = callbacks_list)
Stage 5 — Generating New Molecules:
生成新分子相當簡單。 首先,我們加載預先訓練的權重,這樣我們就可以避免每次在生成新的SMILES字串之前訓練模型。 然後,我們從數據集中隨機選擇一個SMILES字串作為參考字串,並在範圍內生成指定數量的字元,並將整數值轉換回字元。 上面的代碼在技術上可以用於生成任何類型的文本,無論是故事,音樂還是SMILES分子。 根據自定義調整,學習速率,數據集大小和quality,結果會有所不同,但最後我們應該得到一種有效的分子表示字串。 在進行學習新的子結構和分支(N1CCN(CC1)C(C(F)=C2…)分子之前,模型可以藉由僅生成一個字符(NNNNNN)的序列開始。
這是分子二維結構 (O1C=C[C@H([C@H]1O2)c3c2cc(OC)c4c3OC(=O)C5=C4CCC(=O)5)
和三維結構:
O1C=C[C@H]([C@H]1O2)c3c2cc(OC)c4c3OC(=O)C5=C4CCC(=O)5
Possible Improvements
1. Checking the Validity of these Molecules:
我們不知道我們生成的分子是否具有任何用例, 我們必須藉由用於訓練的原始分子進行比較來驗證這些生成的分子是否是有效的分子結構。 藉由計算數據的共同生理化學特徵,以及對訓練數據的特徵使用主成分分析(Principal Component Analysis),我們可以確定新生成的分子是否相應地進行了轉換。
2. Are SMILES Strings even the most optimal way to represent molecules?:
如何確信LSTMs可以在最好的情況下生成文本的樣本,因為SMILES字串只是查看分子化學組成的基本方法。 我們可能會創建更好的方法來表示分子的複雜性,以便將來進行更準確的測試。 然而,目前,SMILES Strings和RNN是使用機器學習產生分子的規範。
3. The Dataset: Through data augmentation
我們可以採用不同SMILES字串的排列,並將它們添加到我們的數據集中。 增加數據集的另一種方法是enumerate SMILES字符串超出其原始形式,或以其他方式編寫。
Changing Drug Discovery: Fragment-Based Drug Discovery (FBDD)
這種產生分子的方法的主要用途之一是基於片段的藥物發現或FBDD。 這是在不使用哨兵(使用其存在作為終止條件的特殊值或特徵)開始輸入的地方,我們可以從已知結合目標疾病機制的片段開始。 通過將這個片段的SMILES字串作為輸入,我們可以用RNN逐漸“生長”分子的其餘部分,從而產生更有效地抵消某種功能的分子! 這種方法肯定有很多希望,並且看起來將來會被更多地使用會很有趣。
Conclusion + Key Takeaways
RNN僅使用數據集上的少量參數來提供了一種簡單而有效的分子生成方法。 該領域的大多數研究都希望結合RL或對抗性訓練等結構,以幫助增加產生的有效分子的數量,或使模型偏向於創造具有特定藥物某些特性的分子。 希望在未來採用這種方法,基於片段的藥物發現變得更加普遍,並有助於使藥物開發更加可行和經濟。 AI是移除創造療法的猜測的關鍵。
Key Takeaways
1. 緩慢而昂貴的藥物開發和材料科學研究是目前方法進展緩慢的直接結果
2. 使用機器學習,我們可以提高研發的速度。
3. 機器學習用於生成分子的最有效用途是使用RNN和SMILES分子字符串表示,但它們不是最佳方式。
4. 我們還有很長的路要走,才能使用人工智能以更快的速度製作更準確有效的分子結構,但還有很多值得期待的東西!
https://towardsdatascience.com/generating-molecules-with-the-help-of-recurrent-neural-networks-c3fe23bd0de2
2019年9月15日 星期日
2019年9月14日 星期六
2019年9月11日 星期三
2019年9月10日 星期二
A reactive force field implementation in LAMMPS
LAMMPS在reax範例中的input腳本(in.CHO)
https://github.com/lammps/lammps/blob/master/examples/reax/CHO/in.CHO
其中data檔(data.CHO)為
https://github.com/lammps/lammps/blob/master/examples/reax/CHO/data.CHO
reax的建模需要注意的是units選取real,atom_style為charge
讀取模型的數據文件,可以嘗試用MS輸出car格式,利用LAMMPS中的msi2lmp工具轉化為所需的數據文件
接著選取potential類型,注意pair_style和pair_coeff應在read_data或create_box後
上述命令中lmp_control為控製文件,用於控制輸出軌跡文件trj,若無需要可將其替換為NULL
ffield.reax.cho存放在Lammps的potential資料夾
https://github.com/lammps/lammps/tree/master/potentials
,在使用其他系統時,可以選用ADF軟件中的potential文件(可以直接使用)。
對於reax的分子動力學模擬,必須有電荷守恆條件(fix qeq / reax),其中param.qeq存放所需原子的參數,從左到右分別為原子類型,電負性(eV),自庫倫勢,軌道指數
上述數值也存在於potential文件中,因此可以將param.qeq替換為REAX/ C,如下圖所示:

其次在進行模擬時,一般可以選用NVT,如果系統分子個數比較少,應增大溫度加快反應進程(去掉fix 1和fix 3改為)
reax的分子動力學模擬,time step應在0.1-1.0之間,一般選取0.25
執行後若要製作動畫,應生成dump文件
畫圖檔指令
topo readlammpsdata data.CHO charge
https://github.com/lammps/lammps/blob/master/examples/reax/CHO/in.CHO
# REAX potential for CHO system
# .....
units  real
atom_style charge

read_data data.CHO

pair_style reax/c lmp_control
pair_coeff * * ffield.reax.cho H C O

neighbor 2 bin
neigh_modify every 10 delay 0 check no

fix  1 all nve
fix             2 all qeq/reax 1 0.0 10.0 1e-6 param.qeq
fix             3 all temp/berendsen 500.0 500.0 100.0

timestep 0.25

#dump  1 all atom 30 dump.reax.cho

run  3000
其中data檔(data.CHO)為
https://github.com/lammps/lammps/blob/master/examples/reax/CHO/data.CHO
# CHO example

105 atoms
3 atom types

0 25.000 xlo xhi
0 25.000 ylo yhi
0 25.000 zlo zhi

Masses

1 1.0080
2 12.0107
3 15.9994

Atoms

   1 2 0.0 10.67229  14.36836  12.47166
   2 1 0.0 11.02446  14.91550  13.35233
   3 1 0.0 11.02446  14.91549  11.59096
   4 1 0.0  9.57932  14.41980  12.47166
   5 2 0.0 11.17534  12.87608  12.47165
   6 1 0.0 10.79792  12.33546  13.34037
   7 1 0.0 10.79790  12.33545  11.60294
   8 2 0.0 12.75013  12.93134  12.47163
   9 1 0.0 13.13241  13.47175  11.60486
  10 1 0.0 13.13241  13.47210  13.33818
  11 2 0.0 13.22294  11.42815  12.47199
  12 1 0.0 12.83858  10.89166  11.60377
  13 1 0.0 12.83959  10.89255  13.34119
  14 2 0.0 14.79762  11.45137  12.47107
  15 1 0.0 15.21044  10.43808  12.47354
  16 1 0.0 15.19550  11.96345  11.58877
  17 1 0.0 15.19648  11.96815  13.35018
  18 2 0.0  0.24250   0.91354   1.10383
  19 1 0.0  0.97225   1.67509   1.39797
  20 1 0.0 24.87363   1.18825   0.11010
  21 1 0.0 24.39847   0.98637   1.79630
  22 2 0.0  0.86944  24.46895   1.11508
  23 1 0.0  1.21047  24.19771   2.11484
  24 1 0.0  0.12679  23.71752   0.84453
  25 2 0.0  2.06454  24.48829   0.08825
  26 1 0.0  1.72846  24.75977  24.08683
  27 1 0.0  2.80951   0.23920   0.35408
  28 2 0.0  2.67036  23.03401   0.12171
  29 1 0.0  1.92204  22.28680  24.85503
  30 1 0.0  3.00638  22.76782   1.12450
  31 2 0.0  3.87027  23.02208  24.10132
  32 1 0.0  4.35176  22.04072  24.06515
  33 1 0.0  3.54082  23.26189  23.08511
  34 1 0.0  4.63935  23.75310  24.37121
  35 2 0.0  1.37929  14.62909  17.52744
  36 1 0.0  1.08393  15.52196  18.08818
  37 1 0.0  2.47385  14.59977  17.52258
  38 1 0.0  1.05260  14.77122  16.49293
  39 2 0.0  0.76275  13.31937  18.14786
  40 1 0.0 24.67295  13.35030  18.12450
  41 1 0.0  1.04396  12.44064  17.56651
  42 2 0.0  1.30113  13.22425  19.62581
  43 1 0.0  2.39107  13.19385  19.65447
  44 1 0.0  1.02336  14.10169  20.21106
  45 2 0.0  0.66878  11.90830  20.21883
  46 1 0.0  0.94960  11.03396  19.63080
  47 1 0.0 24.57945  11.94426  20.18968
  48 2 0.0  1.19125  11.78568  21.69954
  49 1 0.0  0.79365  10.89123  22.18875
  50 1 0.0  2.28374  11.72162  21.74071
  51 1 0.0  0.89616  12.64769  22.30679
  52 2 0.0 11.41750   7.16471  22.76002
  53 1 0.0 11.74866   7.28340  21.72336
  54 1 0.0 11.72154   8.06612  23.30055
  55 1 0.0 11.97469   6.32478  23.18558
  56 2 0.0  9.86319   6.92474  22.85179
  57 1 0.0  9.57626   6.01094  22.33031
  58 1 0.0  9.54930   6.78307  23.88660
  59 2 0.0  9.17390   8.18942  22.21244
  60 1 0.0  9.45849   9.10599  22.73021
  61 1 0.0  9.48557   8.33580  21.17777
  62 2 0.0  7.62459   7.92132  22.31840
  63 1 0.0  7.31756   7.77569  23.35472
  64 1 0.0  7.34468   7.00469  21.79795
  65 2 0.0  6.90692   9.17258  21.68631
  66 1 0.0  5.81845   9.06496  21.71809
  67 1 0.0  7.15914  10.09632  22.21721
  68 1 0.0  7.18992   9.31630  20.63835
  69 2 0.0  4.69047  14.13340  23.48572
  70 1 0.0  4.95366  15.17281  23.26391
  71 1 0.0  5.39163  13.78010  24.24888
  72 1 0.0  4.87514  13.55000  22.57874
  73 2 0.0  3.19477  13.99798  23.95930
  74 1 0.0  2.50599  14.33002  23.18163
  75 1 0.0  2.93803  12.95591  24.15345
  76 2 0.0  3.05322  14.87431   0.26136
  77 1 0.0  3.74058  14.54651   1.04202
  78 1 0.0  3.30993  15.91730   0.07257
  79 2 0.0  1.55058  14.71961   0.71013
  80 1 0.0  1.29864  13.67531   0.89801
  81 1 0.0  0.86725  15.05003  24.92701
  82 2 0.0  1.37850  15.58633   2.01380
  83 1 0.0  0.35341  15.53527   2.39297
  84 1 0.0  2.04062  15.24695   2.81709
  85 1 0.0  1.60704  16.64178   1.83261
  86 3 0.0  8.51658  13.05007  22.43728
  87 3 0.0  9.43965  13.72051  21.88842
  88 3 0.0 18.16518   4.73455   8.81928
  89 3 0.0 18.65469   4.57291   7.66370
  90 3 0.0  6.43553  20.34119  24.80049
  91 3 0.0  6.44898  20.31621  23.53493
  92 3 0.0 21.90539  11.54301  19.82384
  93 3 0.0 20.76137  11.61918  20.36007
  94 3 0.0  3.42232  11.07545   5.77130
  95 3 0.0  3.88671  10.95299   4.60048
  96 3 0.0 11.93988   4.94134  20.86058
  97 3 0.0 12.98804   5.47798  20.39555
  98 3 0.0 14.08646   9.50799  20.80806
  99 3 0.0 14.09449  10.68237  20.33642
 100 3 0.0  3.45246  19.93144  16.38965
 101 3 0.0  2.86282  19.60263  15.31936
 102 3 0.0 12.85008  21.95287  13.63796
 103 3 0.0 12.06593  21.16486  14.24238
 104 3 0.0 24.47055   7.42219  14.24997
 105 3 0.0 24.43181   7.37102  12.98624
reax的建模需要注意的是units選取real,atom_style為charge
units  real
atom_style charge
讀取模型的數據文件,可以嘗試用MS輸出car格式,利用LAMMPS中的msi2lmp工具轉化為所需的數據文件
read_data data.CHO接著選取potential類型,注意pair_style和pair_coeff應在read_data或create_box後
pair_style reax/c lmp_control
pair_coeff * * ffield.reax.cho H C O


neighbor 2 bin
neigh_modify every 10 delay 0 check no
上述命令中lmp_control為控製文件,用於控制輸出軌跡文件trj,若無需要可將其替換為NULL
ffield.reax.cho存放在Lammps的potential資料夾
https://github.com/lammps/lammps/tree/master/potentials
,在使用其他系統時,可以選用ADF軟件中的potential文件(可以直接使用)。
fix  1 all nve
fix             2 all qeq/reax 1 0.0 10.0 1e-6 param.qeq
fix             3 all temp/berendsen 500.0 500.0 100.0
對於reax的分子動力學模擬,必須有電荷守恆條件(fix qeq / reax),其中param.qeq存放所需原子的參數,從左到右分別為原子類型,電負性(eV),自庫倫勢,軌道指數
1 5.3200 14.8732 1.0206
2 5.8678 14.0000 0.9000
3 8.5000 17.9978 1.0503
上述數值也存在於potential文件中,因此可以將param.qeq替換為REAX/ C,如下圖所示:

其次在進行模擬時,一般可以選用NVT,如果系統分子個數比較少,應增大溫度加快反應進程(去掉fix 1和fix 3改為)
fix 1 all nvt temp 3500.0 3500.0 100.0
timestep 0.25執行後若要製作動畫,應生成dump文件
dump 1 all custom mass type xs ys zs fx fy fz畫圖檔指令
topo readlammpsdata data.CHO charge
2019年9月8日 星期日
2019年9月6日 星期五
2019年9月4日 星期三
Windows安裝tensorflow和Keras讓jupyter notebook可以執行
打開Anaconda Prompt,因為安裝anaconda時沒有指定環境變數,所以只能在Anaconda Prompt終端機呼叫conda
$ conda create -n tensorflow python=3.6
$ activate tensorflow
$ pip install tensorflow
$ pip install keras
$ pip install jupyter
$ jupyter notebook
2019年9月3日 星期二
2019年9月2日 星期一
2019年8月31日 星期六
2019年8月21日 星期三
2019年8月17日 星期六
2019年8月15日 星期四
2019年8月14日 星期三
2019年8月13日 星期二
訂閱:
文章 (Atom)